How to Expand VMware Disk Size for Windows VMs
- Byron Zepeda
- Category: VMware
- Read Time: 6 mins

As a System Administrator or System Engineer, one of the most frequent requests you'll receive is to expand the disk size on virtual Windows Servers and Windows Desktops. Most of the time, it's straightforward: 1) make sure you have enough space on the SAN, 2)
add the requested space on the VM, 3) use Disk Manager to rescan the disk to see the newly added space, 4) and expand the drive to its full size. It's easy if the newly added space is next to the partition you wish to expand. It's not easy if the adjacent space is some other partition with data.
Here's what I'm talking about when added space is not contiguous.
What are your options if you see the above? The C drive partition that needs to be expanded is next to the Recovery Partition instead of the 20 GB Unallocated space.
You could rebuild windows, you can use dynamics disk, and quite possibly other solutions, but there is an easier option.
The Fix
Before making any changes, especially in a production environment, take a snapshot, a backup, or a SAN snapshot. Always give yourself a way out in case you make mistakes.
We'll be using GParted to move partitions and then add the space to the portion that needs it.
- Expand the disk size on the VMware side. The OS will see it, but you won't be able to use it just yet.
- Take a snapshot of the VM or take a backup. I'm very cautious, so I do both. Remember to expand the disk size first, then take a snapshot.
- Download Gparted using the most appropriate option for you. In our case, we used the amd64 ISO image.
https://gparted.org/download.php - Launch the VMware Remote Console (not Web Console). This is needed for the next step.
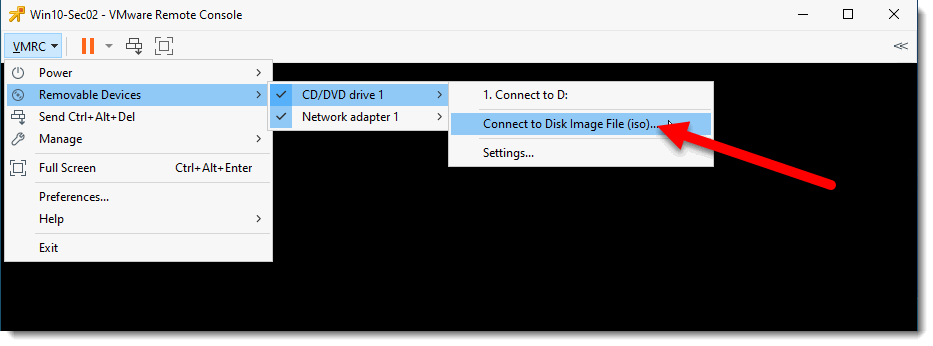
- Within the menu, go to VMRC, Removable Devices, CD/DVD Drive 1, and choose Connect to Disk Image File (iso) to connect the ISO file downloaded previously.
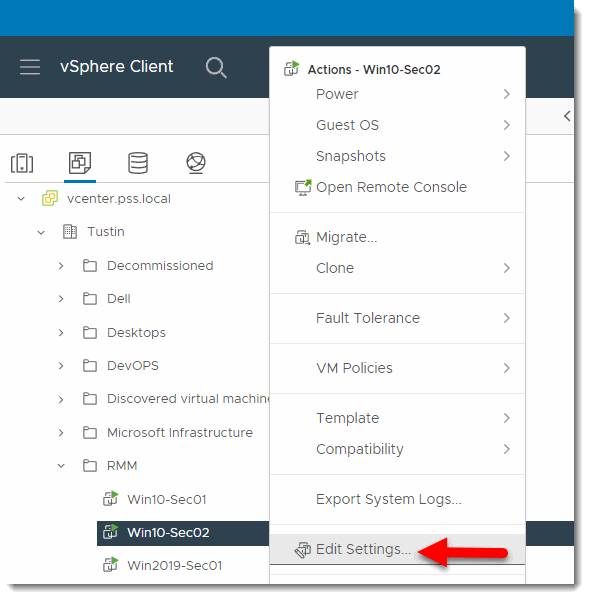
- Make sure the VM is set to boot from the virtual CD-ROM. From the VMware vSphere Client, right-click the VM and go to Edit Settings...
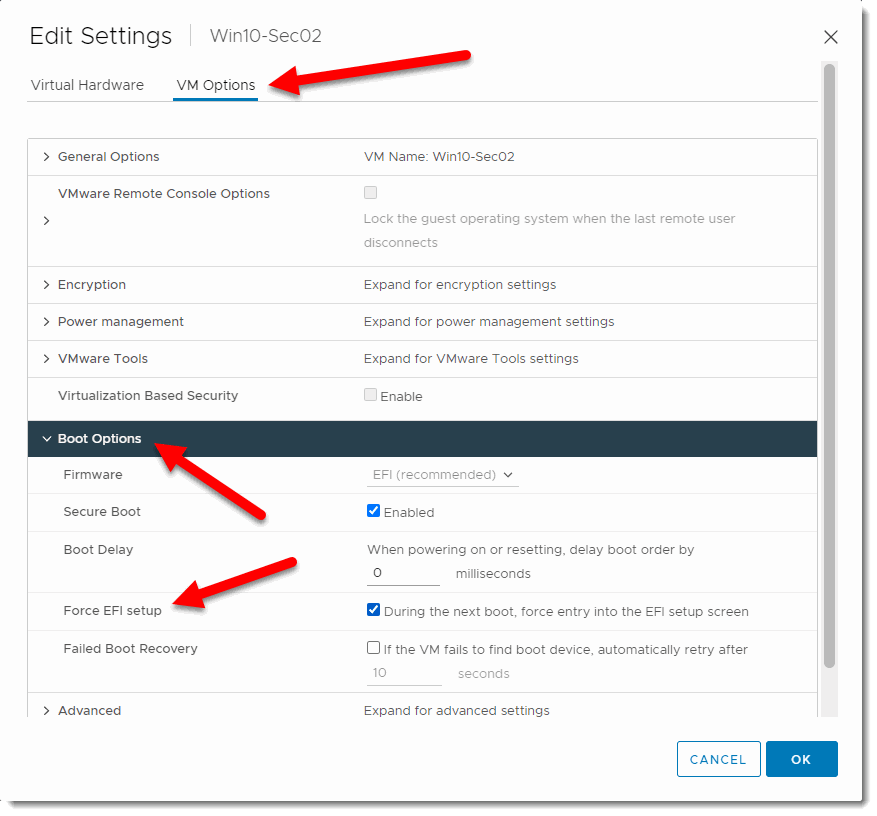
- Go to VM Options, Boot Options, and check the box to Force EFI Setup (Or Force BIOS setup, depending on how you set up your VM).
- [IF NEEDED] If the VM uses the VMware Paravirtual SCSI (PVSCSI) controller, you'll need to power down the VM and change the SCSI controller to LSI Logic SAS for GParted to recognize the partitions correctly. Don't forget to change it back once the expansion is complete as the very last step.
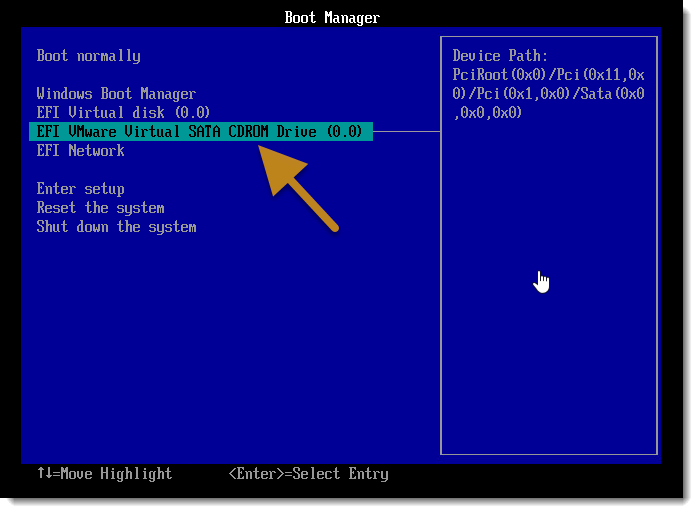
- Power or Reboot the VM depending on what state you have it in to boot from the virtual CD-ROM.
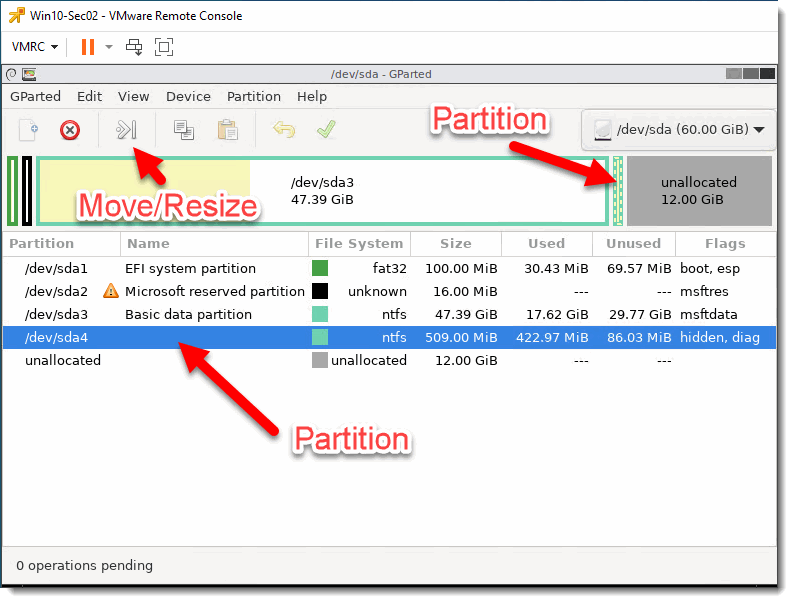
- Run GParted with all the defaults until you get to the main GUI by hitting Enter for all options. GParted will launch, showing you all your partitions.
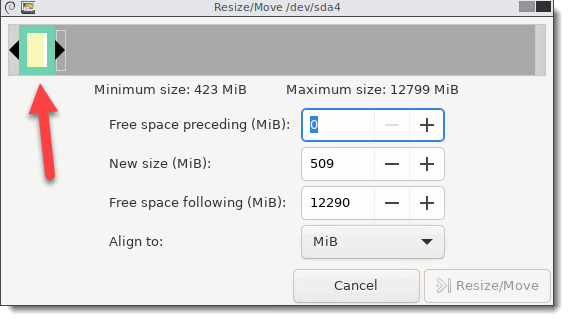
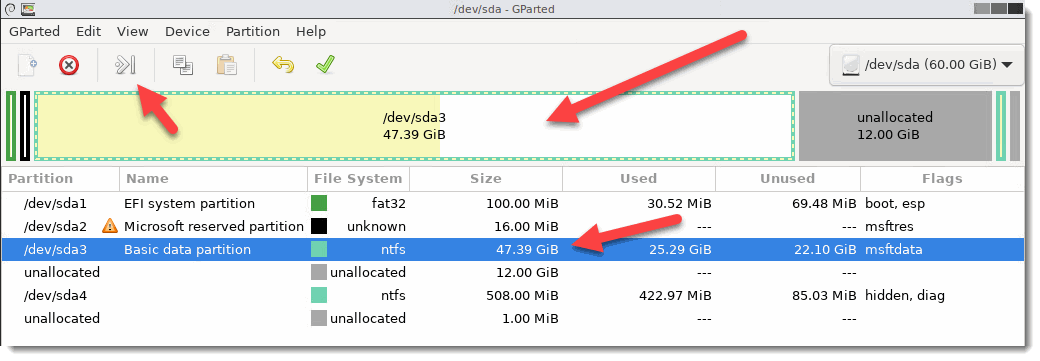
- Select the System Recovery Partition by clicking on it, then click on the Resize/Move button. You can select it either via the visual representation of it toward the top or the table below.
- Click and drag the partition from the left side of the screen to the right side to move the partition to the end of the disk. Do not drag the arrows, but click on the center where you see the yellow.
- You'll get a warning stating the following: "Moving a partition might cause your operating system to fail to boot." Click OK.
- Notice the partition is ready to be committed to its new location and is shown toward the end of the disk now. Click the green check box to Apply All Operations. This may take a few minutes.
- Your main partition is now next to the empty space so that it may be expanded. You can expand it here or within Windows. Since we're here, we'll continue to use GParted.
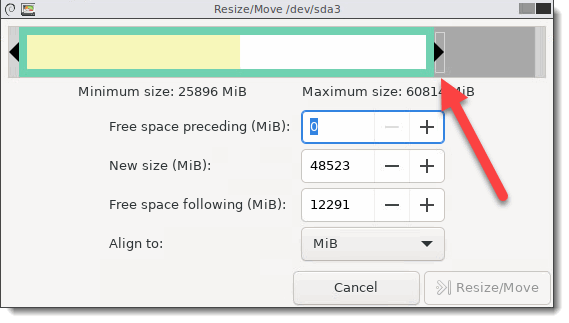
- Select your main partition and click on the Resize button.
- Click and drag the black arrow all the way to the right to expand the partition and click on the Resize/Move button.
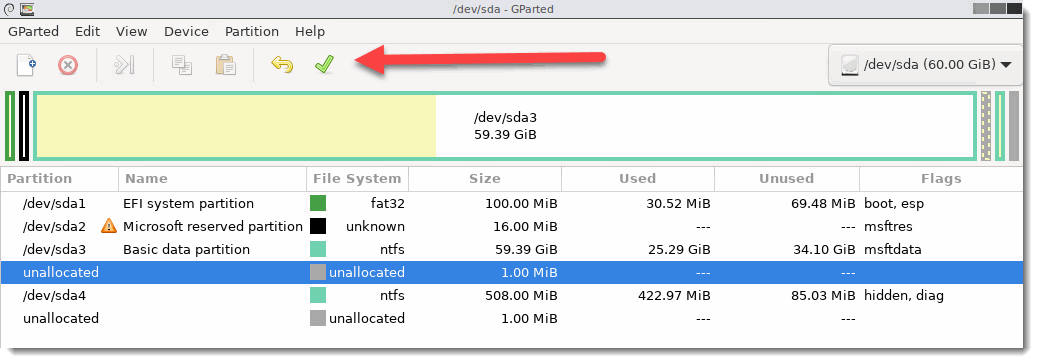
- Notice that all the unallocated space is gone. Click the green arrow to commit your change. This may take a few minutes.
- You'll get a window with a message saying, "Are you sure you want to apply the pending operations?" Click Apply. This will take a few minutes.
- You're good to close GParted and shutdown the VM.
- [IF NEEDED] Revert the SCSI controller to VMware Paravirtual SCSI controller if you changed it in the earlier step.
- Sometimes, when you boot to Windows, the OS will ask for a Check Disk of the C drive. Let it run to make sure any issues are corrected.
Summary
We used this particular solution quite a bit when we deployed Windows 10 VDI and realized the default installation created system partitions toward the end of the drive instead of the beginning. It was not until months later, when someone sent in a service desk ticket, that we realized this was an issue, but by then, we had already deployed dozens of VMs. While we could reissue a new VM, we opted to keep the VMs and deploy a new template that did not have this issue. Newly deployed VMs would not have this issue.
Sometimes when creating your golden images, things get missed. Since this is not typically an issue, we didn't check it. Check your templates; you may find you have this issue.
Popular Tags
Latest Articles
-
VMs get Powered OFF when expanding virtual Disk
-
Temporarily clear locks from your VMs and disks fast
-
Simple Guide on How to Fix a Printer That's Offline
-
SSHing to a Ubiquiti Switch: A Step-by-Step Guide
-
How to Uninstall MSI Using PowerShell and an RMM
-
Getting Started with VMware: Subscribing to VMUG & Getting Discounted Licensing for Your Home Lab
-
AI – A Risky Business: Unveiling the Dangers of AI
-
Key Distinctions between VMware vSphere ESXi and Microsoft Hyper-V
Categories
Certifications
